Stencil-Art is situated in Randburg, South Africa and have been trading since 2013. We specialize in mixed media arts and crafts supplies.
Our aim with this blog is to inspire you to create mixed media projects with products available from our shop. Visit www.stencil-art.co.za to browse our more than 8000 products available in our online and walk-in shops.
Thursday 10 December 2015
Hi Everyone, I have been trying out different colouring-in pencils lately and have been enjoying the Koh-i-Noor Polycolor pencils especially. These pencils are oil-based that makes application and blending so easy.
I used grey graphite paper to trace a colouring-in image onto a A4 Canvas Panel. The image I used is from the Colouring Book - Simple Blessings by Karla Dornacher. I bought this colouring-in book as a PDF downloadable file from her Etsy Shop
I used a Pigma Micron pen to outline the image in black. I will not ever use a Micron pen again to draw on Canvas as the rough texture ruined my pen. The Posca paint Pens are a much better option.
I sprayed the canvas with lots of water and start sprinkling Brusho Crystals until I was satisfied with the background. I tried to use more earthy colours on the bottom; blue, yellow and red in the sky an green on the leaves.
I painted all the areas that I wanted to colour-in with Dina Wakley Clear Gesso to smooth the roughness of the Canvas. I coloured in the image with Koh-I-Noor Polycolor Pencils and used the Derwent Blender Pens to create a smooth application.
I used the Posca Paint Pens in Black and White to add the borders and doodles. I was so pleased with the end result!
Friday 21 August 2015
Hi Everyone, Water colour mediums have always been a challenge for me. I like lots of layers and permanent mediums is just so much easier to work with. I have decided to challenge myself to use more water soluble mediums, and thus I have been "playing" with my Distress Markers. "Dare to be DiFfeRent" Art Journal Page with Distress Markers
INSTRUCTIONS:
I am working in my Strathmore Visual Journal
with Bristol Smooth paper and as always protect the rest of my journal by
placing a sheet of wax paper behind the page I will be working on.
Randomly add colour with Distress Markers and
the Distress Marker Spritzer to the page.
It worked best for me when I placed the brush nib of the markers just
over the edge of the Spritzer tool. Remember the ink will blow from the
spritzer and not the marker.
As the ink in the Distress Markers are
water-soluble I seal it with Liquitex Matte Medium. I prefer to use a brayer to lightly apply the
Matte Medium, a brush will move and blend the colour too much.
Make an absorbent ground by mixing 3 parts of
Liquitex white Gesso with 1 part Liquitex Modeling Paste and apply as smooth
and thinly as possible with a palette knife.
After making sure that the absorbent ground is
dry, lightly sand it to get rid of the uneven and rough parts. This will help
to preserve the brush nibs of your makers.
You don’t need to do this if you are using pencils.
Use the Vases 3 stencils and draw 5 vases on the
background with the fine nib of the Distress Markers. I started drawing the
vases with the same colour, but changed by mind and erased it with a damp
cloth.
Colour directly with Distress Markers on the
flowers and stem stamps from the Flower Garden stamp set by Tim Holtz and stamp
quickly before the ink dries. If this
happens, just spritz it lightly with water to activate the ink.
If you want to change the placement or colours
you stamped, just erase it with a damp cloth.
Start adding colour to the images by dragging
the outlined colours into the centre with a water brush and add more ink as
necessary.
Try not to layer different colours over wet ink
as it is water based and will always reactivate when liquid is added to
it. Also be careful not to use too much
water to blend as water will make the ink run all over the page.
Decide from which direction the light is coming
from, this will determine your shading and highlights. This is especially important as light
reflects from shiny surfaces, in this instance the glass vases. I have decided
that my light source is from the right, therefore I my vases will be darker on
the left side.
I create darker areas by colouring directly with
the marker and blending it with my water brush and then picking up ink from an
acrylic block with a water brush for the lighter areas.
Wipe the water brush on a dry paper towel to
clean it when using different colours.
Use a dry paint brush to blend out a colour
without adding water, this will only soften the colour and not lighten it as
when adding water. Sometimes is also
easier to lay down a different colour by picking up the ink from an acrylic
block with a dry brush. For bold, dark
strokes of colour using the marker directly.
If you would like to change anything in the
image, like lengthening the one flower stem, use a damp foam brush to remove
some of the colour and use the marker to lengthen it.
Add the water line to the vases. The stems of the flowers will be distorted and
enlarged by the water and the vases will look darker where it is filled with
water. Also add some of the colour of
the vase over the stem to create the effect that the stem is inside the vase.
Add reflections of light shining through the
vases and casting shadows behind it – this shadows will be coloured as the
vases are transparent.
Start adding colour to the flowers by dragging
the ink lines from the stamp with the water brush. Be careful to not drag the water brush over
the lines, otherwise it will turn into one ink blot. You need to keep the detail of each leaf of
the flowers.
Create depth by making sure that the flower
stems are correctly placed – in front and behind certain areas of the vase.
Keep on adding layers of colours to the flower,
and try not to add more colour over wet areas as this will just blend the
colours without creating depth. It is
easier to move around the page and work on dry areas only.
Keep on adding colour to the vases to create
dimension and depth and use the Picket Fence Distress Marker to add
highlights. This marker goes on clear
and dries opaque
Use a light wash of Frayed Burlap to create
shadows on the left side of the flowers and stems. If you add to much colour, add water and blot
it with a dry paper towel. I changed
over to a paint brush as the water brush was dispensing too much water and was
starting to bleed into my images. I just
picked up some water that I spritzed on my acrylic block to blend the frayed
burlap to create subtle shading.
Write your quote directly on the page with Black
Soot and Hickory Smoke and remember if you make a mistake you can simply wipe
it off and start again. Use the fine or
brush nib depending on the size of your letters. Use Picket Fence to add
highlight to the letters.
Use the fine nib to add final details to the
flowers.
Lastly add the date.
PRODUCT LIST:
WATCH THE VIDEO:
Saturday 25 July 2015
Hi Everyone,
Have you ever wished that you can use your watercolours on normal paper? I have to confess that the colouring-in bug has bitten me as well! I have tried my watercolour pencils in my colouring-in book, but the paper did not take the water to well. I found this "recipe" for watercolour aborbent ground on the Liquitex Website - 1 part Liquitex modeling paste with 3 parts Gesso.
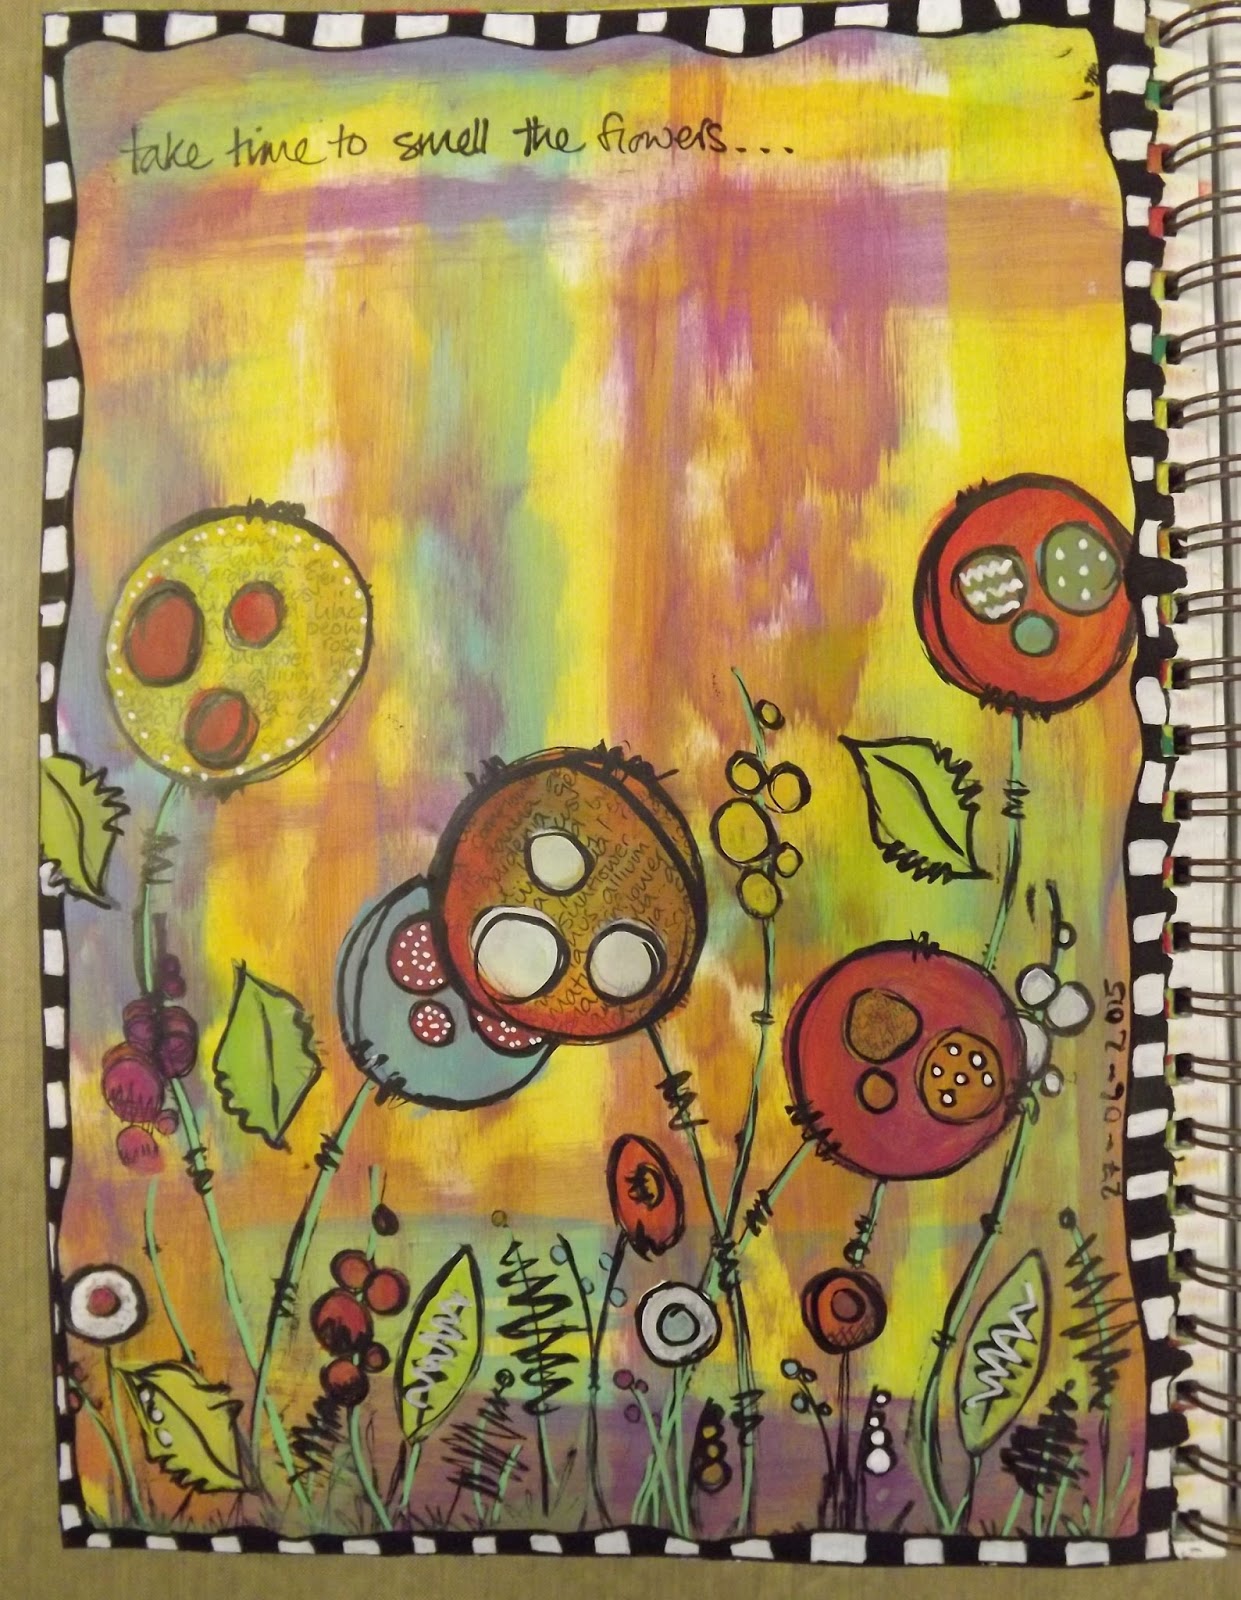
Hi Everyone, For this Art Journal page I tried to use as much of the PaperArtsy products as possible. I love the Fresco Finish Chalk Acrylic paint by PaperArtsy, it dries fast to a matte finish that makes is particularly easy to stamp and doodle or write over.
INSTRUCTIONS:
Use a square piece of Cut-and-Dry foam by Ranger and start applying one colour of paint at a time. I am using the four colours from the Lin Brown limited edition 3 set of Fresco Finish Chalk Paint by PaperArtsy. Make sure that each colour is dry before adding the next colour.
Stamp the flowers from the PaperArtys JOFY 09 Stamp Set with Ranger Archival Ink in Jet Black. Use masking tape to mask some of the stamped flowers so that you create the impression that they are behind and infront of some of the others. Stamp the sentiment that is included in the stamp set.
I also used the masking tape to cover parts of the stamps that I did not want to stamp.
I am not mounting the stamps so that I can manipulate the stems to stamp in different directions.
Use a small paintbrush and "colour-in" the stamped flowers and leaves. Do not think to much about this, just enjoy laying down colour. You can always paint over a colour if you do not like it or add layers of translucent paint.
Use the Posca paint pens to add details to the stamped images, the paint pens gives more control and a steady flow of paint that is difficult to achieve with a paintbrush.
Add the outlines and details with the black Posca Paint Pen.
Create a border around the page by first drawing a rough outline with a thin black Posca Paint Pen (PC-3M) and then adding black and white squares with the thick nib (PC-8K).
Add the date and you are finished - a real quick page and so much fun!
PRODUCTS USED:
PaperArtsy Fresco Finish Chalk Acrylics - Lin Brown Limited Edition 3,London Bus, Snowflake & Limelight
Hi Everyone. Slowly but surely winter is coming... We have been having such a nice warm autumn, just feeling the chill in the evenings and mornings.
Ever since this Bloom Stamps by Jamie Dougherty for Prima Marketing was released I wanted to try it out and I absolutely loved it!
Instructions:
Tim Holtz’s tag tutorial
for March 2015 inspired my art journal page.
I started off by adhering Tim Holtz tissue tape to the background.
Apply Distress Paint in
Abandoned Coral, Squeezed Lemonade, Spiced Marmalade, Broken China, Cracked
Pistachio & Picked Raspberry.I kept
the layers of paint moist by spraying it with water and then when I laid down
all the colours allowed it to run and blend into each other.
Create a mask of the image
to cover the stamped face while applying texture paste to the background. Stamp
the face with Archival Ink on wax paper, dry and cut out.I also used the mask to decide on the
placement of the image.
Stamp the image with Tea
Dye Distress Ink to create a soft outline – this will avoid harsh lines in and
around the image and allows me to blend the outline into the face.
Use repositionable
adhesive spray to temporarily adhere the mask over the stamped image.
Use masking tape to keep
the Butterflies 1 stencil in place and apply Ranger Texture Paste with a
plastic palette knife.This Texture
paste is creamy and light and so easy to apply – my new favourite product!It also absorbs colour and can be dried with
a heat tool.
Use Ranger Snowflake
Embossing Powder over the wet Texture Paste and melt with a heat tool.
Use Derwent Artbars to add
colour to the image.The Artbars can be
used directly on the image and then activated with water or use a water brush
to pick up the colour from the Artbar.
Add highlights and shadows
and remember to let layers dry before adding more colour.
Add more vibrant colours
to the image with Derwent Inktense pencils, the pencils also allow me to add
finer details like the patterning on the butterflies.The Artbars have a soft watercolour effect,
while the Inktense pencils are vibrant and bright.
Use Dina Wakley Matte Gel
Medium to activate the colour on the butterflies, this will give a shinier
effect to the images than water and will also create a different texture.
Add more detail to the
hair with different sepia tones and activate with gel medium.
Shave small pieces of
flesh coloured Artbar with the Shave ‘n’ Save and mix it with gel medium to
make your own paint and apply to the face.
Keep on adding layers of
colour to the face making sure that the layers dry before adding more on top.
Use silver Heritage Artist
Acrylic metallic paint to add a touch of silver to the butterflies, this paint
is very translucent, almost a glaze which will allow the underneath layers to
show through.
Add final touches to the
face with Posca Paint pens in white and black, as well as Inktense pencils
activated with gel medium.By activating
the Inktense pencils I make sure that it is permanent and won’t blend with any
colour added on top. The Posca paint
pens have some open time to blend, but will also dry permanent.
Outline the butterflies
with a Posca Paint pen in silver.
I was not happy with the
butterflies that was cut in half by the mask and decided to rather have the
butterflies going on top, so I applied the texture paste and embossing powder.
Writing the title with the
white Inktense pencil allows me to remove it if I am not happy with the
placement or size. Once I am satisfied I will go over it with the Silver and
White Posca Paint Pens.
Outline the Texture Paste
butterflies with the Silver Posca Paint pen and lastly add the date.
PRODUCTS USED:
WATCH THE VIDEO:
Monday 6 April 2015
MAGIC
FAIRY GIRL ART JOURNAL PAGE
INSTRUCTIONS:
1.I
fell in love with this image ever since I saw it in the Summer Brochure of
Poetry. I scanned the image into my
photo editing program and changed the colour and wiped out the background. I resized it and made a laser printout.
2.Apply
Omni-Gel Transfer Medium over the front of the image with a foam brush, any
acrylic gel medium will work. Let each
layer dry naturally and completely in between, also change the direction of the
application each time from up and down to side to side and up and down again –
I applied 3 layers.
3.Do
no try to speed up the process by drying each layer with a heat gun, as this
makes the image quite brittle and easily tears when removing the paper.
4.Spray
water on the back of the image and carefully wipes away the paper. I used as soft brush to wipe away some of the
smaller pieces of paper. As more paper
are removed the image will be clearer and clearer.
5.While
I wait for the image to dry, I make a start on the background in my art journal.
6.Apply
Bundled Sage, Evergreen Bough and Pine Needles Distress Ink with an Ink
Blending Tool to the background.
7.Spray
water on the Dots stamp from the Dylusions Basic Background Stamp Set and
randomly stamp on over the background.
This will create some subtle dots to the background where the Distress
Ink reacts to the water.
8.Use
the flower and stem images from the Dylusions How Does Your Garden Grow Stamp
Set and stamp with Barn Door and Salty Ocean Distress Ink. Spray with water to create some interesting
blending. Remember this ink is not
permanent and will always re-activate with any medium that is applied on top of
it.
9.Use
the Festive Berries Distress Stain to create blotches on the page by dabbing it
randomly on the background.
10.Apply
Lemon Heritage 3D Crystal Acrylic to the background with a rubber kitchen
basting tool to create texture. This 3D
Crystal Acrylic is transparent and quite thick, it is also very glossy and
tends to stick pages in your art journal together. That is why I will always use this medium in
my bottom layers or add matte medium on top.
11.Dab
some Mowed Lawn and Mustard Seed Distress Stain on a craft sheet and mix with
white Gesso. Apply with a brayer to the
background to mute the bright colours.
My background images was disappearing so I wiped some of the gesso away
with a baby wipe while it was still wet.
12.Apply
Mowed Lawn and Mustard Seed Distress Stain to the background and blend with
some water and a paintbrush.
13.I
sprayed my background with White Linen Dylusions Ink Spray from a distance –
this thin layer of white ink will blend with the Distress Stains
underneath. Use a baby wipe and wipe
some of the Dylusions Spray away through the Loopy Flowers Stencil.
14.Cut
out the image of the girl from the dry image transfer.
15.Use
the Butterfly 3 stencil to create wings for the fairy. Mask off the parts of the wings that will be
behind the fairy with masking tape.
16.Apply
Faber Castell Glass Bead Glitter Gel through the detailed part of the stencil
and leave to dry naturally, as this gel mediums tends to bubble and stay sticky
when dried with a heat tool. As the gel
becomes dry it will turn transparent.
17.Attach
the image with Heritage 3D Contour Paste, I used a thick layer of medium as I
wanted to lift the fairy of the page a bit.
This was a mistake as there was a lot of air trapped underneath the
image and it took a long time to dry.
18.Apply
a layer of matte medium to seal the background and all the water-soluble
mediums. This will enable me to add more
layers without worrying about the mediums underneath. I wiped the matte medium and mix of distress
ink from the wings of the fairy with a baby wipe.
19.Add
solid wings with the Butterfly 3 stencil and Ranger Liquid Pearls in White
Opal.
20.Add
subtle colour to girl and wings with Faber Castell Big Brush pens – this ink is
transparent, easy blend able and permanent once dry.
21.Add
some shine to the wings by applying Heritage 3D Crystal Acrylic Glass with a
paintbrush.
22.Add
Ranger Liquid Pearls in Lavender Lace to the wings to create a delicate change
in colour as the light catches the wings.
23.Use
the Big Brush pens to add some more colour to the wings, I constantly wipe my
fingers on a baby wipe as to not blend the colours together. Also add some Diamond Ranger Stickles to the
raised areas of the wings.
24.Add
a border of flowers with the Cherry Blossom stencil and Barn Door Distress
Paint. Add a thin layer of paint with a
Stencil brush. Add dimension and subtle
change of colour to the flowers by lightly dabbing Spiced Marmalade and Mustard
Seed Distress paint to the centre of the flowers.
25.Use
the Cherry Blossom stencil and Posca Paint Pens to add leaves to the page. Add interest to the flowers and leaves with
Posca Paint pens. These pens are
water-based Acrylic Paints and is opaque and permanent once dry.
26.Add
shading around the images with Big Brush pens.
27.Add
the quote along the stem of the flower with a Pentel Brush pen. The quote is
quite small and reads: “Those who do not believe in magic, will never find
it. – Roald Dahl.
28.Lastly
add the date.
Watch the video:
Thursday 5 February 2015
Hi Everyone,
My first art journal tutorial for 2015! I hope this will be a exciting year with lots of amazing adventures for all!
I titled this page: NEW BEGINNINGS
INSTRUCTIONS:
Decide on the placement of the face and lightly draw the outlines.
Start writing thoughts down on the page, I am writing down all my ideas and plans for 2015.
Randomly stamp the background with clear embossing ink and emboss with embossing powder to create texture.
Apply Gel Medium through the Dahlia mask and stamp it randomly on the background – this will act as a resist once you add the PanPastel colours. Make sure that the gel medium is dry.
Add extra dimension to the background by layering PanPastel colours through the stencil.
Seal the background layer of PanPastel with Matte Gel Medium – apply a thin layer with a brayer. I used my soft rubber Speedball Brayer.
Use the Sporty Girl stencil and draw the outlines with Big Brush pens.Blend the harsh lines and add colour to the whole face.Also add shadows and highlights with the Big Brush pens and blend each time.
Apply a dark colour of Acrylic paint (Dina Wakley Heavy Body Acrylic Paint – Night) with a sea sponge around the face to draw attention to it.
Pull everything together by brayering a thin layer of white Gesso over the whole page.
Use Acrylic Letter Stamps and acrylic paint to stamp the title of the page and add highlights by slightly offsetting the stamp and stamping in white.
Add Shadows and highlights to the word with the Big Brush pens in Warm and Cold Grey.
Lastly outline the word with a black marker once the paint has dried and add the date.