Saturday 29 April 2017

A bit of Abstract Art


Hi.  First of all I hope you are all enjoying the lovely long weekend. April is almost gone so Happy May to all. This year seems to be racing by so fast it'll be Christmas before we know it.
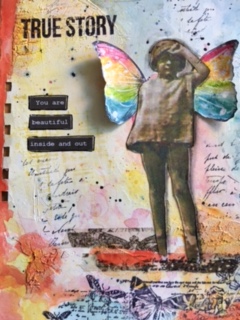
I’ve never been a fan of abstract art in the true sense of "art".  I really didn't understand it, or should I say until now I’ve never been a fan of abstract art. But I must say I’m seeing quite a bit of abstract art journaling around at the moment and I'm loving the randomness of colour and design, and by adding elements and sentiments, takes it to a whole new level for me. What really inspired this page is something I saw on You Tube. but I took the technique in a whole new direction.  I must say I'm happy with the result and I could never, ever get this look with a paint brush or a brayer.

Gelli plate printing is a bit of “hit and miss” for many people, you're never sure what you'll see when you turn the paper over. I usually pull quite a few prints and most times there’s something I like and there are many, many ways to "dikkie" up the prints you don’t like, but that’s for another blog.

There are many. many different ways to create art with a Gilli plate. Some of them complex and some very simple. This is relatively simple but the effect is really lovely.

I removed the plastic cover on the Gelli plate and loaded up a few blobs of acrylic paint.  I used blue, magenta, yellow, lime green and a bit of white.  I personally thought there was just a tad too much yellow on the plate so I carefully removed a bit and the print was fine. In hindsight I would be more careful to stagger the blobs so that they aren't in such a straight line.


So now for the big technique ………. I used the cardboard inside from a roller towel cut down to about 10 cm to drag the paint down and across the Gelli plate.
When you try it don’t cover the whole Gelli plate, leave some empty gaps. 
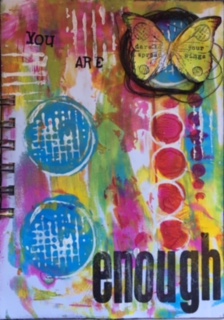
I added some blue circles to the Gelli plate with my finger and then placed photo copy paper onto the plate, rubbed gently and pulled my first print.
Sorry but I forgot to take a pic of this step but I have a pic of the result. 
I added a little more Magenta acrylic paint to the Gelli plate, placed a small circle stencil over it, put my print on top of it and rubbed over the stencil and pulled the second layer of the print.  I lifted the stencil and pulled another print from what was left on the Gelli plate. This is the result of the first print.
 
I put a thin layer of white paint onto my craft mat; well truth be told not my craft mat because I couldn’t find it, so onto the desk went the White paint.  I used the inside of the roller towel I had been using, to stamp an outline around the large blue circles, and the lid of a spray ink to outline the Magenta circles.


Then out came my most favourite stamp of all time, Stampotique Kate Crane mixed media cube. There are four stamps on the cube and they are really awesome. I stamped the inside of the circles with the grid stamp using the White paint, and the lines stamp here and there.  I was careful to wash my stamp immediately. I also cleaned up the desk and its as good as new. Well almost. My desk has seen a lot of action in its time.

I have some very nice small alphabet stamps that I use often in my journaling and I recently bought the Tim Holtz alphabet foam stamps.
They are also fast becoming a favourite. I just can’t leave them alone at the moment.  I stamped the words “YOU ARE” in a small Upper Case font  using Black Archival ink [I had to go over the letters with my Black Posca Pen as they didn't stamp too well]. Then at the bottom of the page I stamped the word “enough” using the Tim Holtz alphabet foam stamps.  I like the contrast between the small and large stamps.


I stamped the Finnabair butterfly stamp onto a scrap of Gelli print using Black Archival ink and fussy cut it. 
Instead of gluing it down I stapled it onto the top circle.  I ran my Archival black ink pad around the page and then glued it into my journal. 


I'm never sure where I'm going when I create.  I very seldom have a plan and things evolve as I go along, so needless to say after everything was complete and the page glued into my journal, I wound some black cotton into a circle and glued it onto the page. It gives the page another layer and I think it draws the eye up to the top of the page and then down.

I will definitely be doing more abstract art journaling in the future and I hope you will all try it too.

Supplies

Gelli-Arts Gel Printing Plate
Acrylic paint- various brands in blue, magenta, yellow, lime green and a bit of white
Cardboard inside of paper roller towel
Wet Wipes and roller towel
Copy paper
Glue
Small capital letters alphabet stamp
Tim Holtz “Block lower” foam alphabet stamps lower case
Lid from ink spray bottle
Some black thread
Stampotique Kate Crane cube mixed media stamp
Black Archival Ink
Black Posca Pen
 

Friday 21 April 2017

Artist Trading Cards


I’ve been seeing ATCs on several blogs lately and, blow me down with a feather if my friend Sally doesn’t gift me with ATCs as well.  This got me thinking that I’d do a couple of ATCs and share them on the blog today.  The only rule is the size; 64×89 mm or 2.5×3.5 inches.

What I really like about the Artist Trading Card is that anyone can make them. They're totally creative, fun and really, really addictive once you start. If you’re like everyone else these days thinking your life is too busy, making these tiny original works of art is not a huge time commitment, and it’s good for your soul. I also use them as gift tags or little notelets.


I used texture paste mixed with a few dry tea leaves from a used tea bag on this one, as well as a bit of paper ribbon from my stash. The stamp comes from the EEA4 Paper Artsy set by Everything Art and is stamped in Potting Soil Archival Ink and embossed with clear embossing powder. I used a glue gun to attach the dried flowers [I think they’re Primulas from last winter’s blooming [which I found in my stash] and pop ups to lift the heart to the same height as the stems of the flowers. I tied a bit of twine around the ATC then ran Potting Soil Archival Ink around the edge to finish it off. It is a little fragile with the dried flowers, but beautiful none the less.


I used Distress Collage Medium and a small piece of left over dictionary paper. Distress Crayons in Salty Ocean, Mustard Seed and Shabby Shutters. I stamped the background with the chicken wire stamp from the Stampers Anonymous Tim Holtz Cling Rubber Stamp Mixed Media set using Archival Viridian ink. I inked up the Tim Holtz Cling Mount Stamps: Bird Feather and stamped the nest twice once on the ATC and once on a spare scrap using Potting Soil Archival Ink then fussy cut the nest from the spare scrap. I coloured both with Gathered Twigs and Peeled paint distress Markers using an Aquafine water colour brush.

The wings come from the Finnabair “Don't Forget To Fly cling stamp set”. I stamped and coloured them, fussy cut them together with the Pin Up Doll [which I also had in my stash] and coated her in multi medium gloss, then cut a slit in the nest, inserted her into the nest then glued everything down. I couldn’t resist a bit of doodling on the wings with my White Posco pen. I ran Potting Soil Archival around the edges and lastly used two Big Chat Idea-ology stickers to finish it off.


On this ATC I used a die cut from the Sizzix Mixed Media #2 set. A layer of Ranger Distress Collage Medium and distress crayons in mustard Seed, Picked Raspberry, Salty Ocean and Wilted Violet.  I used a stencil and a semi dry baby wipes to remove a bit of colour on the bottom of the ATC. I did this after I took the pic. Finished it off with some twine and two words from the Big Chat Idea-ology stickers.


I love, love, love this ATC.  I stamped the flower from the Anatomy Of A Page Dylusions Cling Stamp Set with Hickory Smoke Distress Ink. Used Ranger Distress Markers, an Aquafine wartercolour brush and added some doodling with a White Posco Pen.  Lastly I ran my Black Archival ink pad around the edge to finish it off.


The background of this ATC was created using a scrap of dictionary paper, some texture paste and a bit of paper lace. I used a little Aged Mahogany Distress Spray along the left edge and around the outside. The trellis was a cut using Tim Holtz Frameworks Die Lattice and coloured with a bit of Bundled Sage Distress Ink Spray. I wound a bit of white cotton around the Distress Sprayer then glued it to the trellis using my heat gun. The butterfly comes from the “Don't Forget To Fly cling stamp set”.  I added a bit of glitter to the wings and finished it off with a couple of words from the Idea-Ology Chit Chat Stickers. I ran my Black Archival ink pad around the edge to finish it off.


I stamped a few images onto tissue paper using black Archival Ink and when dry glued it to the ATC using Ranger Distress Collage Medium then covered it all with some Gesso. I drew the girl and coloured her with Water Colour pencils. I used a text stamp over her dress and added a word from Big Chat Idea-ology stickers.


On this ATC I used texture paste mixed with a few dry tea leaves from a used tea bag, as well as a bit of paper ribbon from my stash. I used Moss Green Brusho on the background. The images come from the EEA4 Paper Artsy set by Everything Art and were stamped using Black Archival ink then coloured with Terracotta Bushos. I don’t know where the paintbrush stamp comes from.


I inked up an image from the EEA4 Paper Artsy set by Everything Art and stamped using Black Archival ink for this ATC. Coloured it by rubbing Ranger Distress Markers onto an acrylic block and using and a Water colour brush.  The image didn’t stamp dark enough so I used my Black Posco pen to go over it here and there.

Well that’s it for today’s blog. I hope you’ll all spend some time making an ATC or two.  They’re so fun to make and there is definitely something magical about making these miniature pieces of art.

Friday 14 April 2017

A Certain Kind of Darkness


I saw the quote "a certain kind of darkness is needed to see the stars" somewhere on the internet a while ago and it’s been stuck in my head since then. I knew I would have to do a page using it otherwise it would stay there and drive me crazy.

I pondered for a while about what to do because I really wanted the quote to be the focal point. It didn't quite turn out like that; the stars sort of over took it, but I like the end result  just the same.

To get my initial colour down I used Derwent Art Bars in various shades of blue/turquoise.


I used my ranger sprayer applying only a little pressure to get droplets rather than a fine spray. I left it for a minute or two, then used a roll of paper towel to lift a bit of colour off here and there.

When that layer was dry I wet my brush and stroked it over the Midnight Art Bar and then painted onto the page again.


I repeated this step until the background was quite dark and left it to dry. I had to do this more than once to get the intensity I was looking for.   


I coloured a piece of scape paper using Green Art Bars, did a little stencilling, cut a scalloped edge and glued it to the bottom of the page.

I used another scrap that I had lightly sprayed some dylusions ink sprays onto for the houses. 


I inked up the Stampotique stitched-houses-9262 stamp with Black Archival Ink and stamped out a few houses, fussy cut them and glued them onto the border.


Now for the moment of truth. I’m wasn't feeling too confident about writing with a white pen onto a dark background, as I didn’t want to mess this one up, so I found a nice font and created the quote on my computer, making sure that it would fit on my page and printed it onto tracing paper. I used a piece of white graphite to trace the words onto my page, then went over with my White Posco pen. Cheating??? Well maybe, but improving my lettering skills is on my bucket list for this year and I will find the time, but until then, well Graphite is my friend.


I used some White Ranger distress paint in White and an old toothbrush and created a few spatters, then stencilled the stars using my White Posco pen.


Using both White and Black Posco pens I added a bit of doodling to the houses.


I added a border right at the end.


 I’m really happy that I’ve finally created something with that quote.


Supply List

Mixed Media watercolour paper

Derwent Art Bars in shades of blue and green

Water colour brush

Ranger Distress Sprayer

Stampotique -stitched-houses-9262 stamp

Scraps of paper/cardstock

White and Black Posco pens

Glue

Ranger White Distress Paint

Old toothbrush 

Thursday 6 April 2017

TRUE STORY


Happy April everyone!  

Today I’m sharing a mixed media page in my A5 spiral bound journal. This year I’m hoping to use up some of my stash. I buy all sorts of things then tend to hoard them. And then new stuff comes out and I want that.  And so my stash grows and grows. 

Because I’m using watercolours and quite a lot of water I needed quite a substantial substrate so I cut a piece of Aquafine 300gm watercolour paper to A5.  I didn’t want to stick it into the journal as it is quite thick, I punched holes in the left hand side so that when it is finished I can slip it into my spiral bound journal. 
To begin I spread some Wendy Vecchi Crackle texture paste onto my page here and there and while it was still wet sprayed a little water onto a script stamp and stamped into it to add a little texture. [this is one of the items I have had in my stash like for ever].
 
Then out came the watercolours.  I love how soft and dreamy the backgrounds look. 
  
 
I sprayed the page with water then began applying the colours, just a little at a time, leaving each layer to dry before applying the next.  I repeated this until I was happy with the look. 
  
I’ve been experimenting with my watercolours and one technique I really love is to use watercolour as an ”ink” when stamping.  I stamped once on the upper left hand side and once on the right hand side. 


I found some Tim Holtz washi tape [I have rolls of this in my stash and seldom use it] and applied a little to ground my image so that she wouldn't look like she was floating in the air. Then also applied some at the top for balance. Its quite wide so I tore it in half.  I also made a few splatters with various colours. 
 
I printed a vintage image from my own stash of vintage images. It’s actually a picture of my mom as a child down at the beach.
  
After fussy cutting her I coated the image with a layer of Multi medium Gloss which I bought by mistake but use it quite often now that I have it. This picture is very, very old and the Multi Media Gloss seems to bring out the details in these sorts of pictures.
I stamped the wings then spread a layer of Wendy Vecchi crackled texure paste. When dry I used a combination of watercolours and Tim Holtz distress crayons to colour them. The distress crayons have a lot of pigment which gives bright colour. 
  
I glued my image onto the page being careful to insert the wings behind her before gluing down the top half. I didn’t glue the wings down completely as you will see.
 
I did some random stamping with a script stamp and black archival ink, I didn’t use a block but sort of rolled the stamp so that only portions of the stamp stamped.  
I have lots of word stickers and chose “you are beautiful inside and out” as my sentiment. After sticking them down I outlined each word with my black Posca black pen.   
  
For me, “a page is not done til its done”, and I couldn’t resist a little more fiddling, so I stamped the words ‘TRUE STORY” at the top left hand side which was looking a little bare and used another stamp to add a little interest on the bottom right hand side.
Then out came the watercolours again and I dripped a little orange down the left hand side and also filled in a few more areas with orange which just  made the page pop for me.  I think its done!  I also doodled on the wings with my White Posca pen.  I also used a soft charcoal pencil to outline the image so that it blended into the background. 
  
Now to get the page into my spiral bound journal! This little trick [which I've read somewhere on the internet] is handy if you want to add pages to any sort of already-bound book, whether you’re using a bought journal or one you’ve made and bound yourself.    
 
After the holes are measured and punched, use a pair of scissors to snip through the edge into the space left by the binding holes.  
Then it is just a simple case of lining up the binding holes and lightly pushing the splits around the rings.   
 
Some people might know this, but for those who don’t it’s really worth sharing. 

Supplies:

Aquafine 300gm watercolour paper
Various water colour paints
Water colour brush
Washi tape
Various stamps
Wendy Vecchi crackled texture paste
Black archival ink
Vintage image
Black and White Posca pens
Gathered Twigs distress ink
Ranger Multi Medium Gloss
Mister
Printed sticker words
Small scissors for fussy cutting