Monday, 24 July 2017

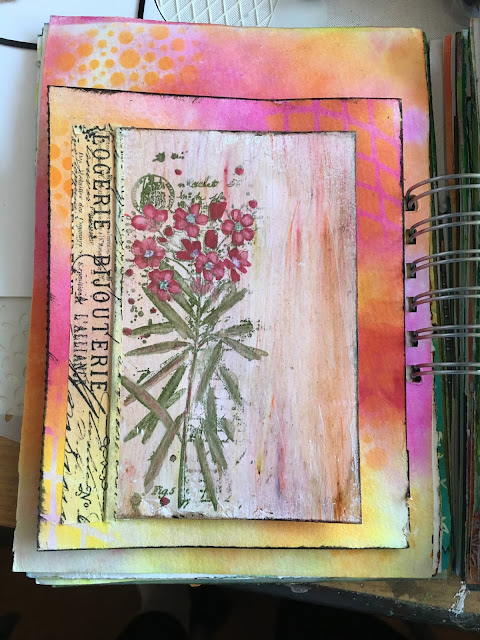
I must have flowers, always and always


Happy Monday Everyone. Nice to have you join us for today's blog post/tutorial.
 
I must say I had an idea for today’s project and it went pretty much according to plan.In winter when the garden is looking particularly sad, all of a sudden the Primulas pop up and provide this profusion of glorious colour. I don’t think they have been genically modified as so many plants have now been, otherwise we'd have to sew them year after year.  They make me so happy that I wanted to record it in my journal.
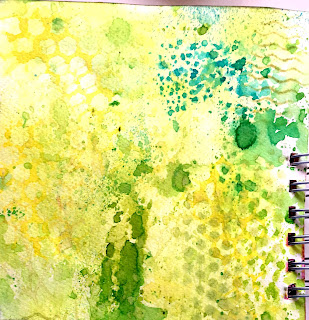
 
 
I used Squeezed Lemonade Distress Spray and Fresh Lime and some cut grass Dylusions Spray on my craft mat and squished the page onto it. Then I added a little Turquoise and touched the page here and there.
 
To the topleft side and,middle right I applied Mustard Seed Distress ink through a chicken wire stencil using a half damp wet wipe. I also applied Peeled Paint Distress ink through a wiggly line stencil and a handmade stencil from the Tim Holtz Mixed Media Die set I to other areas of the page. I love how the additional layers add texture and interest to the background now.
 
 
I die cut some flowers using white card stock and the Sizzix Wild Flowers die and coloured them using Worn Lipstick and Spun Sugar Distress markers for the flowers and Twisted Citron and Peeled Paint for the leaves and stems. 
 
 
I coloured each flower individually and before the Distress Marker could set, I immediately used my Ranger Distress sprayer [only pulling the trigger back about half way] to create some lovely effects on the flowers and leaves.


For the strip at the bottom of the page I stuck a couple of pieces of Ranger text Washi tape to a scrap of card stock then tore it from narrow to wider and layered another scrape of torn card stock on top of it, but before I attached it to the page using double sided tape, I distressed the edges of both pieces using my Ranger distresser and then applied Peeled Paint Distress Ink right from the stamp pad around the edges.  I wound some lovely green string around the “anchor” and tied a bow on the left hand side.
 
I covered the back with a few strips of double sided tape but didn’t apply any pressure when I placed the strip onto the page as I wanted to be able to tuck the flower stems behind it. I glued the flowers down with a thin layer of Glossy Accents, then I secured the top strip down.
 
I am a sentiment “stasher” and have them in different forms, some stamps and some digital.  I printed out I" must have flowers, always and always" cut it to size and used double sided tape to secure it to the page.
 
I inked up my little bee stamp with Black Archival ink and stamped a couple of bees which I coloured with a Fossilized Amber Distress Marker and added some sparkly to the wings using a gel roll pen
 
The page didn’t feel quite finished so I inked up a stamp from the Stampers Anonymous Tim Holtz Cling Mounted Stamp Set - Classics 4 Stamp Set and stamped here and there. I also stamped to the “strip on the page” which finished it off nicely.


I love flowers, but the Primulas, in their varying shades from pale pink to magenta bring with them a special joy for me. When the Primulas finish blooming I gather up the seeds and scatter them around the garden and they faithfully appear year after year. When I look at this page, during the coming months when winter is over it will remind me that the Primulas will magically appear in the middle of winter next year.
 
Supplies:
Craft Mat
Wet Wipes
Squeezed Lemonade Distress Spray and Fresh Lime and some cut grass Dylusions
Mustard Seed and Peeled Paint Distress Ink Pad
Black Archival Ink Pad
Bee Stamp
Stampers Anonymous Tim Holtz Cling Mounted Stamp Set - Classics 4 Stamp Set
Sizzix Wildflowers die
Card Stock
Computer generated sentiment
Worn Lipstick, Picked Raspberry, Peeled Paint, Twisted Citron Distress Markers
Ranger Sprayer
Sakura clear star Gel Roll pen
Double Sided Tape
Ranger Gossy Accents

Monday, 17 July 2017

Mixed Media Gift Bag - Always be on the lookout for the presence of wonder

 
Hi everyone. I hope you all had an awesome weekend. This week's project didn’t start off as a gift bag. In fact I was trying out a technique for some cards, and then didn’t really like the result very much, but before I knew it I had created this lovely gift bag for all my daughter's prezzies.  

I’ve had a few scraps of card stock, amongst many other things, lying around just waiting for some inspiration so these became the substrate for my technique play. To start with I mixed Liquitex Matte Medium with a little water to make a glaze. [I think it was about 4 parts Matte Medium to 1 part water - I saw this idea somewhere on my travels].
 
I used a flat brush to brush a good layer of the Matte Medium mixture over my card, sprinkled on some Moss Green Brushos [not much] and picked up a little more Matte Medium mixture and dragged the brush down in one direction until the Brushos had streaked and blended a little. I did this on two pieces of scrap cardstock. Love this technique but its not much on its own.
   
I’ve had the PaperArtsy Hot Picks 1301 stamp in my stash for quite a long time, well over a year now [I’m thinking more like two], and it hardly ever comes out to play. I inked it up with Olive Archival Ink then used a dry wet wipe and an ear bud to wipe off the areas I didn’t want stamped and stamped over the Brusho background. I didn’t rub too hard, and as it happened a faint print where I had rubbed it off still showed - a happy mistake. I coloured the image using Tim Holtz Distress markers and this is when disaster struck. I hated the butterfly and the card almost ended up in the bin.


A while later an idea struck me. I die cut two butterflies using the Tim Holtz Butterfly duo die, used two or three different brushos and left them to react. I inked up the the embossing folder that comes with the die using Ground Espresso Distress ink, then carefully repositioned the die cut and embossed. The result is really pretty. 


Now I was feeling inspired again. I used the Ground Espresso Distress ink to ink up a clock stamp [I think its a Memory Box stamp - I've had it for a 1000 years - well not quite - you know I'm exaggerating right!]. I spritzed the image with water and added a light sprinkling of sandstone Brushos and left it to dry.


I love the way some of the crystals don’t always dissolve and there are little sparks of colour here and there.
 
I layered the clock over the stamped butterfly on my card experiment and put the embossed butterfly over the top. I distressed the edges and ran the Ground Espresso Distress ink pad around the edges, but I still wasn’t really happy with the card thingy so decided I'd use it on an art journal page.


I used Yellow and Teracotta Brushos to create a background on a sheet of A4 watercolour paper and added some texture paste. Can you see the little pops of colour.

The page needed something to anchor the experiment card to, so I fished out some bits from my stash. [ I don't think I'll use my stash up in my life time].


I layered the torn dictionary paper and the die cut onto the journal page then layered the card on top. I found a film strip die cut, cut it into two pieces and placed one on the top and the other on the bottom under the card. Then I glued everything down.  I then added a little more texture paste over the card and the page as well as to the righthand top corner.
 

.   
I used another stamp from the PaperArtsy Hot Picks 1301 stamp and inked it up with Black Archival ink and stamped lightly here and there to create some interest.

I distressed the edges of the page and ran the Ground Espresso Distress ink pad around the edges. Somehow the page wasn’t quite working for me, so I added some of the Olive green Brusho’s to the top, right hand side and bottom of background page. Now I'm happy with the look.


Last but not least I used a lovely sentiment from the Stampers Anonymous Tim Holtz Cling Stamps - Handwritten Thoughts.


I was planning a visit with my daughter and her family and needed a gift bag for all her goodies, so out came one of the plain white A4 gift bags I always keep.  I used double sided tape to attach the "journal page" to the gift bag.   I’m really happy with it now, and even happier that some of my “older” stuff got a chance to come out to play. 

There’s so much evolving in the craft world these days and so much new stuff coming out all the time that it’s easy to forget our “old stuff" on the shelf while we move eagerly onto the next new craft supply. Well I often do!!!


Supplies:

Bought plain white A4 size gift bag
A4 sheet of water colour paper
Olive green Archival ink stamp pad
Black Archival Ink stamp pad
Ground Espresso Distress ink pad
Stampers Anonymous Tim Holtz Cling Stamps - Handwritten Thoughts.  
PaperArtsy Hot Picks 1301 stamp 
Clock stamp
Liquitex Matte Medium 
Flat paint brush
Tangerine, Yellow, Olive Green and Sandstone Brushos
Distress Sprayer
Texture paste
Stencil
2 x scraps of card stock
Scrap of dictionary paper
Scrap of die cut
Film strip die cut
Tim Holtz Butterfly duo die/embossing folder
Wet wipes
Ear bud
Distressing tool
Double sided tape


Monday, 10 July 2017

Gelli Print Inspirational Art Cards


Today I’m sharing some Gelli Print Inspirational Art Cards I’ve made as a gift. For the Gelli printed backgrounds I used Lime, sky, turquoise, Magenta, Fuchisia, Tagerine and Cheddar Dina Wakely paints, first brayered onto my craft mat, then picking up a little at a time brayered onto my 12.7 x 17,78 cm  Gelli Plate, then pulled a print, slowly building up the layers.

I didn’t think this one through beforehand and printed onto 15 x 21 cm cardridge paper, which meant I had to glue the finished papers onto cardstock then trim down to the size of the Art cards.  Next time I will make sure I use cardstock to start with and Gelli print both sides.

Below are two prints before they were cut down to size and decorated.


I wanted 15 double sided Art cards which meant I needed 15 sheets of Gelli prints, and I really didn’t have time to print all those, so I fished around in my stack of papers, and found some mop up pages and some Gelli prints. As it turns out they all work really well together.


 My trusty mark making tools and some White and Black paint were used to beautify my Art Cards.

I also tore up some music paper and stamped out some inspirations using Black Archival Ink onto cartridge paper. I drew around some of the stamped images before lifting the stamp off the paper, then cut them out, others I tore. I am a hoarder of quotes so printed out a few as well. I cut these with a ruler and craft knife.


On some of the Art cards, I glued the music paper down using Liquitex Matt Medium and added a quote and on others I just glued a quote down.

Some doodling using Black and White Posca pens and doodled borders finished the Art Cards off nicely.

The intention is that they stand on a little easel and every day the card can be turned so show a new inspiration for the day so I whitewashed the small Easel and when dry placed my Inspirational Art Cards onto the Easel.


I think they make an awesome gift for some lucky person.

 Thanks for stopping by. See you next time.

Supplies
Lime, sky, turquoise, Magenta, Fuchsia, Tangerine, Cheddar, White and Black Dina Wakely paints
Gelli Plate
Liquitex Matt Medium
Craft Mat
Brayer
Wet Wipes to clean off the Gelli Plate and brayer
Black Archival Ink
Stampotique Kate Crane Mixed Media stamp
Corner rounder punch
Black and White Posca pens
Small Easel
Mark making tools : Dina Wakely Media tools, small lids, bit of old pen, old gift card, stencils sponge
Craft knife and ruler
Scissors

Tuesday, 4 July 2017

Today I’m Tipping-In


What is a Tip-In you may ask? A tip-in is a page or set of pages created outside a book, to be attached into it later.
Tip-Ins aren’t something invented by altered book artists, sorry to say but they’ve been around for a long, long time. Pick up any magazine and you’ll find examples of tip-ins; they’re extra features or adverts that are attached into a magazine after it has been bound, and they’re often designed so they can easily be removed.
They’ve been adapted by art journalists and other artists to include in their art work.  Tip-Ins can be glued into the spine, hinged onto a page, Washi taped and even stapled in. 
Whatever way they are used, I love using tip-ins. They add interest and a certain element of mystery to art journal pages.

So, here are a few examples of Tip-Ins I have used in my art journaling. This background was done with Water Colour on the Gell plate and the tip in is the mop up or the ghost print.  Its been very carefully glued into the spine.


Below is an acetate tip in where I used Washi Tape on the top. I love how the different colours from the background page show through the acetate.


Below is a hinged tip-in.  One side of the hinge is glued to the page and the other side glued to the tip-in. There is journaling behind the tip in.


So the reason behind me tipping-in today, is that a while back I was trying out a technique for a future project and this left over tag has been hanging around my craft desk ever since.


I really like it and wanted to use it on an art journal.  I will tell you about the background technique in a later post, but the stamp I used is a Paper Artsy Hot Picks HP1305EZ stamp. I inked it up with Olive Green Archival Ink, then wiped most of the text away with a wet wipe then stamped and coloured the image using Ranger Markers.  I love how it looks against the streaky background.  As usual I swiped my Ground Espresso Ink pad around the edges.

So, to stray a little, when I create backgrounds using spray inks, sometimes I mop up extra left over ink onto blank pages in my art journal.  However, what happens is that I end up with two or more pages with the same colour ink, and not only that but the same stencils and if I don’t think about things the pages also follow one another, which is what happened with the two pages I used for my tip-in today.

I carefully tore one background page out of my journal, cut it to just a little bigger than the tag. I lined the two outer edges of the pages together, being careful to leave a very small gap between them and used Ranger Washi tape to attach them. I first taped the Washi Tape onto my craft mat and coloured it with Tim Holtz Mustard Seed and Picked Raspberry Distress ink using a foam applicator. It’s best to make sure that your Washi Tape is equal on both pages but I couldn't do it this time.


Okay one tip-in done [well almost] and one to go.  I lined up the tag onto the left side of the Tip-In but couldn’t use the half and half rule because the stamping was a little close to the edge. I used Ranger Washi Tape to tape the Tip-In page and the tag together . I flipped the tag open and taped the other side as well.


Now to be honest I chose a quote from the Tim Holtz Cling Rubber Stamps URBAN TAPESTRY Stampers Anonymous CMS061 set, inked it up with Black Archival Ink and stamped the Tip-In. It looked really horrible. It was too close to the left edge and then I made it worse by drawing a squiggly line around the text. More horrible!!!!!


I closed the flap and using it as a guide, drew a border on the background Tip-In using a Black Posca Pen. Applied two coats of Gesso with a palette knife and left it to dry, and then I stamped the image again. Much better, but it was a little light so I used a 0.1 Uni-Pin fine line pen to go over the text, and stamped just the word creative onto a bit of scrap, fussy cut it and glued it on.  I used a stamp from the Dylusions “Bordering on the Edge” stamp set to stamp a border with Black Archival Ink.


The back of the tag wasn’t looking very pretty so I applied Dylusions Yellow Zest, Pure Sunshine and Bubblegum paint with a wet wipe. Before it dried I used a stencil and wiped back some of the paint. I used the left over paint on the wet wipe to colour the Washi tape.


Last but not least I printed out the words” Create Art Everyday”  and stuck only the left edges onto the card, so that I would still be able to flip it open.

Looking at the Tip-In I felt that the original page in the journal also needed a border, so I stamped a border using a stamp from the Dylusions Clearly Borders stamp set. I will do something on the original background page at some stage, but for now I’m done.

Thanks for stopping by.  See you next time!

Supplies:

Paper Artsy Hot Picks HP1305EZ stamp
Olive Green and Black Archival Ink Pad
Picked Raspberry, Salty Ocean, Peeled Paint Ranger Markers
Ranger Washi Tape
Dylusions Yellow Zest, Pure Sunshine and Bubblegum paint
Wet Wipes
Tim Holtz Cling Rubber Stamps URBAN TAPESTRY Stampers Anonymous CMS061 set
Dylusions “Bordering on the Edge” stamp set
Dylusions Clearly Borders stamp set
Tim Holtz Mustard Seed and Picked Raspberry Distress ink
Ranger Foam Applicator
1 Uni-Pin fine line pen
White and Black Posca Pen