Wednesday, 7 March 2018

Live your Dreams

Hi Everyone,

I get so many customers asking how to use Faber-Castell Gelatos.  Faber-Castell Gelatos are acid-free pigment sticks that glide on creamy smooth for vibrant colour and coverage.  It can be used with or without water.


Products Used:

Faber-Castell Gelatos in Red Cherry, Bubblegum, Tangeringe, Mango, Lavender & Lemon Yellow
Posca Paint Markers PC-1M in White, Black, Red, Yellow, Pink, Orange, Violet & Silver
Dina Wakley Gel Medium 118ml
Punches (bought years ago)
Stencil-Art Stencil Angie's Journaling Words 1 A5
Stencil-Art Stencil Bubbly A5


Tuesday, 27 February 2018

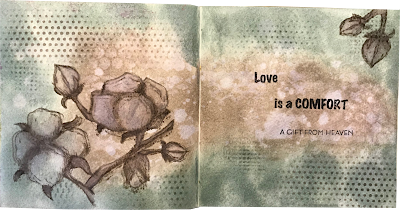
Love is a Comfort

Hi Everyone,

Can you believe that February is almost gone?  For some reason I am always more creative when the weather is slightly cooler.  With the chill in the early mornings, autumn is definately on its way.

The technique I am sharing today, is so simple! So simple that I decided to rather post a Youtube tutorial.  


Products Used:

Ranger Distress Inks Pads - Pumice Stone & Iced Spruce
Ranger Distress Marker - Pumice Stone
Altenew Cotton Comfort Stamp Set ALT1873
Ranger Archival Ink Pad - Jet Black
Stencil-Art Stencil A5 stencil - Texture 1 STBP035


Tuesday, 20 February 2018

Create your own calm

Hi Everyone,

Visible Image from the UK produces high quality clear photopolymer stamps, their designs are unique, original and great for any craft project!  My project was inspired by the "Create Your Calm" stamp set from their new releases for 2018.  


Working on a ceramic tile , I stamped the seahorse with Ranger Archival Ink Sepia into a rolled out piece of white DAS Air-Dry clay. 

Cut out the stamped image with a craft knife.

Smooth all the edges with a rubber tip tool and place the ceramic tile with the seahorse in the oven to speed up the drying time.  I baked it at 70 Degrees Celsius until dry. I turned it over a couple of times and baked it for about 1 -2 hours.


After the clay has cooled I sprinkled Brusho Crystals (Sandstone) onto the seahorse and sprayed with water.

I used a heat tool to dry the Brusho and stamped with Jet Black Archival Ink.

Prime the MDF Plaque with Gesso and as I am using watercolours I also painted with Golden Absorbant Ground. 

Sprinkle Sea Green and Turquoise Brusho Crystals and spray with water.  I dried in between the layers with a heat tool.

Spread Ranger Transparent Matte Texture Paste through the Bubbly stencil with a palette knife and use a heat tool to dry. 

Use the circle stamps included in this stamp set and stamp randomly on the background with Ranger Archival Ink in Manganese Blue and Cornflower Blue.

Seal the background with Dorlands Wax Medium.  

Stamp the sentiment included in the stamp set with Jet Black Archival Ink.

Use Diamond Glaze and add pieces of string to the background. Also add dots with Ranger Stickles (Turquoise & Mermaid) and Ranger Liquid Pearls (White Opal).

I used iCraft Mixed Media Adhesive to adhere the seahorse. I glazed the Seahorse with Diamond Glaze and added Stickles and Liquid Pearls.

PRODUCTS USED


Monday, 12 February 2018

Mixed Media Distress Crayons

Hi everyone. I’m using my Distress Crayons for today’s page.  I've had them forever and never used them. The smooth water-reactive pigments are ideal for creating brilliant backgrounds, watercoloring, smudge effects and more!


To start I glued down dictionary pages, then covered with Gesso. When dry I scribbled over the page using distress crayons in mustard seed, twisted citrus and picked raspberry smudging each colour. I sprayed the surface using the Ranger Distress sprayer and turned the page to allow drips to run down the page.
......... and then for some reason I changed my mind and continued to cover the page with distress crayons smudging to blend them.

I applied some Gesso using a pallet knife and cut some scallops from dictionary paper then added them to the page. I squiggled some Dayler Rowney Acrylic Artist Ink in two places. Mmmmmm didn’t like it very much.


I covered up some of the white with distress crayons and used Distress Crayons through various stencils as well as applying the crayon to a stamp, spraying with water and stamping.


I punched some circles from left over gelli prints to which I had already added some stamping and glued them down, coloured in some petals, the stem and some leaves using a Faber Castel Pitt pen through a Stencil-Art flower stencil and another stencil.


 I used a wet baby wipe to wipe away some crayon in various places; love the effect.


Now to the mess at the top of the page; I covered the black squiggles with Gesso, but being the impatient person I am, I tried to apply more Distress Crayon before it had dried. I then applied another layer of Gesso and when that dried I  reverted to my acrylic paints in an attempt to cover it up.
I used by finger and some pink acrylic paint inside the scallops and outlined them with a Posca black pen. Used a dried up Ranger paint applicator for the white circles.


Last but not least I used a stencil for the word “believe”.


Supplies:
Ranger Distress Crayons
Dictionary paper
Circle Punch
Various Stencils
Black and White Posca pens
Faber Castel Black Pitt Artist pen
Pink and White Acrylic paint

Monday, 5 February 2018

Art Journal - Digi Stamps


Hi everyone. I bought some Digi stamps from Vera Lane Studio and have been wanting to share how I used them in an art journal page.  They can easily be used for cards as well, so here goes.

A digi stamp is an image you can buy (or occasionally download for free) from craft websites. They may also be called digital stamps, or more affectionately ‘digis’. Once you’ve bought your stamp, you can simply print it off and colour it in as you would with a traditional stamped image.

Depending on what software you have, it is also possible to resize and even flip (create a mirror image of) the digital images to make them appropriate for cards of any shape or size. You can do this on Paint (which should already be installed if you have Windows) or Photoshop. Picasa and Gimp are image manipulation programmes you can download for free. It is easy to resize images in Word too and many computers will have this programme already-installed.

To create the background I cut off two 1” pieces from an Inkssentials Cut-N-Dry Stamp Pad Foam sheet and used the black side to sparingly apply Dylusions Fresh Lime and Calipso Teal paints to my art journal page. Just apply a little bead at a time and use a circular motion to apply the paint. It gives a slightly different look than when I use the foam side. It uses far less paint than using the spongy side. I didn't invent this technique.

Next I stencilled in a few places using the Stencil – Numbers Mix stencil and Dylusions Fresh Lime, this time using the spongy side of the cut and dry. Used Ranger Aquamarine Archival ink and stamped a couple of times in other places, then added splatters in Calipso Teal and white watered down paints. I love splatters – to me they lift the page.

I used a black and White Posca pen to do the border.


 I resized the images in my software programme and printed them out then fussy cut them. Coloured them using Jane Davenport mermaid markers.  Tip:  I used the tiniest little drop on an acrylic block and a water brush to colour them. I used a glue stick to attach to the page as the mermaid markers are reactive to water and might have run if I had used wet glue.  Added some Silver Stickles to the crowns and wings. I used a white Posca pen to add some extra detail to the images.

My sentiment reads……………..”No ordinary love story”.

Last but not least Vera Lane Digi stamps are “quirky” which I love.

Supplies:
Resized and Printed Vera Lane “Kiss the Frog” digi stamps
Inkssentials Cut-N-Dry Stamp Pad Foam sheet
Scissors
Dylusions Fresh Lime and Calipso Teal paints
Stencil Art Stencil – Numbers Mix stencil A5
Stamps
Ranger Aquamarine Archival ink
Black and White Posca pens
Silver Stickles
Jane Davenport Mermaid Markers
Waterbrush
Acrylic block
Glue Stick

Monday, 29 January 2018

In my Imagination

Hello everyone! I can’t believe that we’re at the end of January already. Where does the time go??????????

Today I’m playing in my A5 loose page art journal. This is the first journal I ever made, and the reason its loose leaf is because I can add pages whenever I want.  In other words if the page is a mess it can disappear into obscurity into the wastepaper basket.  Well, that was my thought process a long time ago.  Every now and then I get it out look through the pages and add another one.

Back to today’s page.  Firstly I must apologise for the quality of the images.  The turquoise is really a beautiful shade of turquoise and the lime green is bright.  For some reason the turquoise looks blue ad the lime green looks yellowy.  I think it could be the overcast day??????????
The inspiration is definitely the image.  As soon as I saw it I knew I had to make a page with it.  I took the easy way out and printed the image directly onto my loose A4 page.  My intention here was to use Gelatos so I gesso’d the whole page except for the image. BIG mistake. Water colour does not like gesso!
Add a few torn strips of tissue page and glue down with Gel Medium.

Use a text stamp to stamp text here and there using black Archival ink pad.

Use a little white Gesso to the page to knock back the tissue paper and stamped text a little.

For some reason I changed my mind about the Gelatos and used my water colour palette instead. 

Spray quite a lot of water onto the palette and pick up the colour using a waterbrush and fill in all areas.


Use a stencil and white texture paste to apply a little texture to the page.


Colour her lips with a coloured pencil.

Add sentiments. Mine are: "in my IMAGINATION " [Tim Holtz rub ons and words.  I added two more sentiments. "Truth be told" and "creativity takes courage".

In the end I went back and used Gelatos in lime green and turquoise on several places.


Last but not least, I went over the edges of the page with a broken china distress ink pad.


Supplies:

Image
Mixed media paper A4
Black Archival Ink
Text stamp
Stamped Tissue paper
Broken China distress ink pad
Water brush
Stencil
Texture paste
Gelatos: lime green and turquoise
Daler Rowney Water Colour paints in lime green and turquoise [I mixed yellow and green for the lime green]

Monday, 22 January 2018

Purple Rain


Hello! I hope you all had a wonderful break over the holidays.  Holidays for some but not for all I’m sad to say. I’m so glad to be back on the blog.

Today’s play is in my 6 x 6” midori type handmade journal.  What I really like about this journal is that the signatures are made up using different types of paper. Some of the signatures are already stitched but not all.  In this case I used a double page of water colour paper that wasn’t stitched yet only because I wanted a double page spread and couldn't find an unused one.  I’m also a bit of a messy crafter and didn’t want to spoil the other papers in the signature.  When the signature is filled I will stitch it and add to my journal. In the meantime it lives in my journal but remains unstitched.
 
There are many ways one can work with Brushos. They are such a versatile product. Here's how I created this spread.
 
 
Spray an acrylic block with water. Shake Brushos then sprinkle over the acrylic block adding colour where you want it. Just like adding salt or pepper. Remember a little goes a long way. Be patient and watch the colour spread.  I don’t have purple Brusho’s for some reason so used Pop Rock purple magicals instead.  You can add more water or more Brushos if you need to.  Spray the water colour paper lightly and lay it down onto the acrylic block. Apply a little pressure to the paper then lift off the bock. Repeat for the second half. If you’ve got a really big acrylic block you can do the whole background at once, I did the two pages separately. There's no way of knowing or even replicating how the crystals fall so the result will always be a surprise, even if you have an idea of how you want it to come out.

You can dry with a heat gun if you’re impatient, but I left mine to dry naturally. I added a little more sea green to  the page but this time I gave it a light spritz with a fine mister then sprinkled a little of the powder over the area and waited for the magic to happen. I love the little bursts of colour here and there.


For the next layer, add a little water to a small mister. I’ve got this really amazing straw with a little scoop at the end.  I used this to add a little Pop Rock purple magicals to the mister. Lay a stencil over the paper and spray a little colour. Lift the stencil and use it like a stamp on another part of the stencil. Leave it to dry.  It adds a little more interest to the piece.


Apply Wilted Violet Distress ink to the rain stamp {this is the only purple ink I’ve got} and stamp the rain across the top of the page. You can see that I’ve varied where I placed the stamp. Stamp the puddles and the girl with black Archival Ink. 

Water down a little white paint and splatter here and there being careful to avoid rain girl. I got a little white paint splattered on her and used my black Pitt Artist Pen to cover it up when it was dry.

The words come from the song Purple Rain by Prince. I used a White paint pen to write them but they didn’t show very well so I outlined with a fine black pen.


Last but not least, I like to go over the edges of the page with a black Pitt Artist Pen.
 
 
I hope you will try this.
 
Supplies:

Daler Rowney 300gsm hot pressed water colour paper
Stamps: Visible Image Sparkle in the rain
Stencils: Blowing Bubbles  and Rainy Days both A5,
Black Archival Ink
Wilted Violet distress ink
Black Faber Castel Pitt Artist Pen, White paint pen
Brushos : Ultra Marine, Sea Green, Turquoise and a touch of Cobalt Blue
Fine mister and water and a small mini mister
Acrylic block