Thursday, 6 April 2017

TRUE STORY


Happy April everyone!  

Today I’m sharing a mixed media page in my A5 spiral bound journal. This year I’m hoping to use up some of my stash. I buy all sorts of things then tend to hoard them. And then new stuff comes out and I want that.  And so my stash grows and grows. 

Because I’m using watercolours and quite a lot of water I needed quite a substantial substrate so I cut a piece of Aquafine 300gm watercolour paper to A5.  I didn’t want to stick it into the journal as it is quite thick, I punched holes in the left hand side so that when it is finished I can slip it into my spiral bound journal. 
To begin I spread some Wendy Vecchi Crackle texture paste onto my page here and there and while it was still wet sprayed a little water onto a script stamp and stamped into it to add a little texture. [this is one of the items I have had in my stash like for ever].
 
Then out came the watercolours.  I love how soft and dreamy the backgrounds look. 
  
 
I sprayed the page with water then began applying the colours, just a little at a time, leaving each layer to dry before applying the next.  I repeated this until I was happy with the look. 
  
I’ve been experimenting with my watercolours and one technique I really 
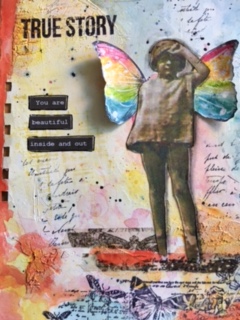
love is to use watercolour as an ”ink” when stamping.  I stamped once on the upper left hand side and once on the right hand side. 


I found some Tim Holtz washi tape [I have rolls of this in my stash and seldom use it] and applied a little to ground my image so that she wouldn't look like she was floating in the air. Then also applied some at the top for balance. Its quite wide so I tore it in half.  I also made a few splatters with various colours. 
 
I printed a vintage image from my own stash of vintage images. It’s actually a picture of my mom as a child down at the beach.
  
After fussy cutting her I coated the image with a layer of Multi medium Gloss which I bought by mistake but use it quite often now that I have it. This picture is very, very old and the Multi Media Gloss seems to bring out the details in these sorts of pictures.
I stamped the wings then spread a layer of Wendy Vecchi crackled texure paste. When dry I used a combination of watercolours and Tim Holtz distress crayons to colour them. The distress crayons have a lot of pigment which gives bright colour. 
  
I glued my image onto the page being careful to insert the wings behind her before gluing down the top half. I didn’t glue the wings down completely as you will see.
 
I did some random stamping with a script stamp and black archival ink, I didn’t use a block but sort of rolled the stamp so that only portions of the stamp stamped.  
I have lots of word stickers and chose “you are beautiful inside and out” as my sentiment. After sticking them down I outlined each word with my black Posca black pen.   
  
For me, “a page is not done til its done”, and I couldn’t resist a little more fiddling, so I stamped the words ‘TRUE STORY” at the top left hand side which was looking a little bare and used another stamp to add a little interest on the bottom right hand side.
Then out came the watercolours again and I dripped a little orange down the left hand side and also filled in a few more areas with orange which just  made the page pop for me.  I think its done!  I also doodled on the wings with my White Posca pen.  I also used a soft charcoal pencil to outline the image so that it blended into the background. 
  
Now to get the page into my spiral bound journal! This little trick [which I've read somewhere on the internet] is handy if you want to add pages to any sort of already-bound book, whether you’re using a bought journal or one you’ve made and bound yourself.    
 
After the holes are measured and punched, use a pair of scissors to snip through the edge into the space left by the binding holes.  
Then it is just a simple case of lining up the binding holes and lightly pushing the splits around the rings.   
 
Some people might know this, but for those who don’t it’s really worth sharing. 

Supplies:

Aquafine 300gm watercolour paper
Various water colour paints
Water colour brush
Washi tape
Various stamps
Wendy Vecchi crackled texture paste
Black archival ink
Vintage image
Black and White Posca pens
Gathered Twigs distress ink
Ranger Multi Medium Gloss
Mister
Printed sticker words
Small scissors for fussy cutting

Friday, 31 March 2017

Easter Gifts : Embossed Metal Book Cover


I need some Easter gifts and really racked my brain to come up with something non-chocolate. 

Then I remembered that some time ago I bought a few 10 x 10 cm, 100 page, chipboard covered books. They are lovely little notebooks and I knew they would make just the right gift once decorated. 


I painted the inside and outside of the front cover with Dylusions black paint, using a Ranger Ink Blending Tool & Foam and left it to dry. I also ran the applicator around the edges to make sure everything was covered with black paint. I have to say the finished look is really good. 

I cut a piece of Silver Creative Craft Metal Sheet to 8.5 x 9.5 cm and taped it over a texture plate. 


And then ran it through my cuttlebug.

If you don’t have one, no worries, use a paper stub to rub the impression onto the metal. It takes a bit of elbow grease and time but it works. Once you have the design, place the metal on a hard surface and begin defining areas more.

Working from front to back repetitively, push out from the back on a soft surface and neatening from the front, on a hard surface, until you are satisfied with the detail and the height of the raised areas.

This step is not necessary if you’ve used a cuttlebug or similar machine to emboss your pattern.

Because the design is what is known as low relief, there is no need to fill the back with beeswax. I removed the tape and then added colour with alcohol markers. Making sure I worked it in.

I rounded the bottom corners with a corner rounder and used a clear sealant to seal the pieces. When dry, I glued them to the front covers of the notebooks.

I applied more colour and sanded the raised areas with a sanding grip (use a soft cloth to wipe away any dust) and sprayed with sealant.

Magic happened and I now love it! The perfect Easter gift! 

Supplies:

10 x 10 hardboard covered notebook/s
Silver Creative Craft Metal Sheet
Dylusions Black Marble
Ranger Ink Blending Tool & Foam
Texture Plate
Cuttlebug or paper stub
Alcohol pens or Alcohol Ink
Glue
Spray Varnish

Thursday, 23 March 2017

Life is a Bunch of Roses

Hi. Angie here again.  I’m still on my watercolour roll but using a different product this time.

I’ve had my pack of eight Brusho Colours in my stash for a long, long time, but never got round to using them before, so today I’m experimenting in my  small square journal.

I stamped my Stampotique 9046 Cabbage Rose image onto watercolour paper using Jet Black archival ink and used a  Pentel Aquash Water Brush Pen to colour the image using Bushos. I added a little shading here and there by picking up a little darker colour .


If you end up with too much paint use the corner of a tissue or paper towel to draw up a little water.


I used a white gel pen to colour in the dots and strips on the image to add a little extra detail.


Then I applied Ranger micro glaze over the image being careful not to go outside the lines. I had a little help from a que tip. 

I wet the entire surface of the page then sprinkled with the Brushos. I used a wet watercolour brush to smoosh the pigment around a bit but not too much that it spoils the star bursts and where necessary filled in as closely to the image as I could.


Stamped the border using black archival ink.  This stamp is not completely straight so used a black Posca pen to fill in where necessary and added some extra doodling.

To finish off stamped the sentiment “Life is a bunch of roses”.  You will see that the stamping is a little crooked, but then it adds to the charm of the page. I used by black Posca pen to go over the letters which accentuated them. I also went over her eyes with two little dots.  Then I outlined the stems and roses and her shoes.


There are so many different techniques you can use with Brushos. They are really vibrant and you need such a little, but most importantly there are so many different techniques for Brushos that they will be out and about again before to long.

Supply List:
Brushos Assorted pack of eight colours
Small [watercolour paper] experimental journal
Stampotique 9046 Cabbage Rose
Dylusions Clearly Alpha stamp
Dylusions Clearly Borders
Dylusions Word Love DYR34629 stamps
Set of small alpha stamps
Black Archival ink
Ranger micro glaze
Large No. 10 watercolour brush
Pentel Aquash Water Brush Pen - Medium Point
Black and White Posca pens
White gel pen.

Thursday, 9 March 2017

Hi. Angie here again.  A happy March to everyone!  (I should have said that in the first post, but I forgot.)

I’m still on my watercolour roll, but thought I would share this page from my A4 Art Journal I have done some time ago.

I glued bits of music and dictionary paper onto my cardstock [avoiding the centre as its where my focal image will be] and used Derwent art bars to create the background. Next, I brayered over with a small amount of Gesso. I used Wild Plum Adirondack Colour Wash mixed with a little water and Ranger Mustard Seed Distress Spray Ink in a pipette to create the drips.

I drew my circles for the dream catcher and used a black Posca pen to outline and doodle and other Posca colours to complete.

Printed my sentiment onto tissue paper, cut it out and stuck it onto the page. Stamped and coloured the butterfly then stuck it down.

I cut the feathers from some watercolour paper scraps. Drew the dangles and coloured them in. Then stuck the feathers down.

Thursday, 2 March 2017

Hi everyone,

Angie here!

I am now officially the blog lady and I am sooooooo excited!  I really have a passion for art and troll various blogs on a daily basis admiring the various art works. There are so many fabulous artists out there and every day I am inspired. 

Watercolour painting is becoming very popular in all forms, from really realistic to a more free flowing stylized art form which I must say is more my kind of thing. 

I’ve just finished a watercolour workshop with the fabulous watercolour artist, Caryl Park [Find her on Facebook at Passion for Arts and Crafts] and feeling so excited about water colouring.   

Watercolour poppies with a little help from my friend the stencil, is the inspiration for today’s easy project.


Materials and tools 

If you are new to watercolours, I don’t believe you need expensive supplies to start having fun and making art! And, it really depends on the project. If I was creating, say a page to frame for somebody, I would probably use good watercolour paper and good paints and brushes but today I am having fun in my practice landscape art journal so I’m using pretty cheap supplies from Stencil Art.


  • Paper: I used heavy weight cartridge paper
  • Brushes:   Stencil Art stocks a good variety of watercolour brushes from cheap to the really good ones which are quite expensive. I like using those with a nice round tip for poppies. For this particular project I used a number 8 brush for the petals and a number 1 brush for the stems and leaves.
  • Watercolour paint: you don’t have to buy the most expensive kinds to start painting . I used a basic watercolour set. I squeezed mine out into a palette but you can use a white plastic plate for mixing your colours. I used Gamboge Yellow, Yellow Ochre, a touch of Scarlet Lake and Cadmium Red, Cadmium Orange, Rose Madder and a mixture of Apple green and Sap Green for the stems and leaves.
  • Uni Posca Paint Marker PC-1M Ultra-Fine – Black and White
  • Ranger Distress Ink - Peeled Paint around the edges of the paper seems to always finish it off.
  • Two empty yoghurt containers of water for wetting and rinsing brushes.
  • Stencil-Art Poppies stencil


Instructions:

Using a HB pencil and the Poppies stencil, I traced the outline onto heavy weight cartridge paper and used an eraser to lighten the lines so that they were just visible. For this image I went over with a pen so that you can see the lines.


I used a mini mister to spray my watercolour palette and then prepped my paint. Using the pencil outline as a guide I picked up two different shades of colour and using not more than two brushstrokes per petal [for the side on poppies] filled in the colour.

Oranges and yellows look nice with pinks and reds so I’ve used warm colours next to each other on the colour wheel and played around with some simple brushstrokes, just trying to stay loose and free and not thinking about it too much.  
For the side on poppies, I started at the outside of the petals and used a lot of pressure so that the bristles splay out, then dragged a little, and lifted the bush up.
I repeated this for all petals varying the colour by picking up more of one colour than the other.

While the petals were still wet, I picked up some sap green on a small brush and painted in the calyx. If the petals are wet enough the green will be drawn slightly into the petal giving the calyx a softer more natural look.


For the full on poppies I used a similar technique but used more brush strokes and did not lift the brush up to the same angle.
I used a combination of greens and a number 1  brush for the stems. The leaves are not difficult to do but I would practice first, same technique as the petals but much smaller strokes. I used a number 1 brush.


I applied my favourite Tim Holtz Distress Ink Peeled Paint around the edges to give the page a finished look.
Last but not least I used my black and white Posca Paint Markers to fill in the poppy seeds and do a bit of doodling around the edges of the poppies, stems and leaf stems. 


I really enjoyed doing this page and I hope you do to. Give it a try!  

Tuesday, 22 November 2016

Hi Everyone,

I absolutely fell in love with Faber-Castell Polychromos Artist pencils and are so happy to share that it will soon be available in the shop. I use it in conjunction with my Koh-i-Noor Polycolor pencils that is unfortunately only available in 72 colours, whereas the Polychromos are available 120 colours!


Today’s colouring page is from Winged Daydreams by Monique Day-Wilde.

Sprinkle Lime Green  Brusho Crystals on the page and spray with water. Make sure that the page is bone dry before colouring.

 Colour with Koh-i-Noor Polycolor and Polychromos pencils. 

Add final details with Pentel Hybrid Gel Grip Pens.


Thursday, 20 October 2016

Hi Everyone, 

Another page done in the colouring-in book "Town Daydreams" by Monique-Day Wilde. This time I used Copic Ciao markers and finished with colouring-in pencils.